Messaging between Python and C++ applications
I recently wanted to create an image-processing pipeline made up of a combination of C++ programs and Python scripts. Rather than integrating direct communication (or direct calls) within the applications, I wanted flexibility in the design of the pipeline to allow for experimentation. The solution was to make use of a messaging architecure and opted for RabbitMQ as the messaging broker.
Architecture
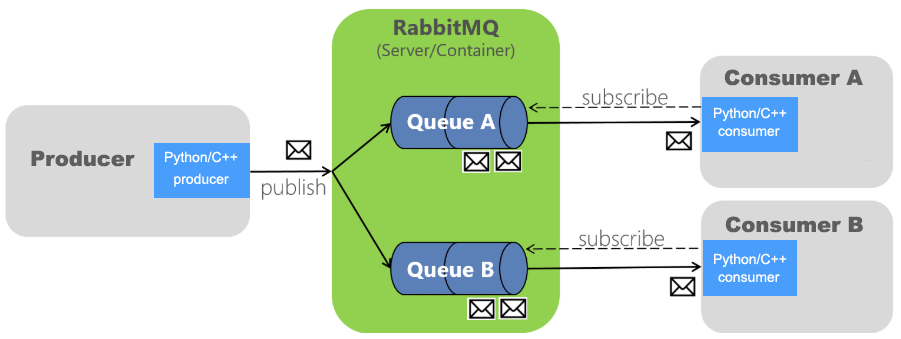
The following figure illustrates the adopted messaging architecture.

Applications in the image-processing pipeline can act as producers and/or consumers. And RabbitMQ acts as the messaging broker to transfer messages between the applications.
Producer and Consumer classes
I created Python and C++ classes to encapsulate the messaging code. These are indicated by the blue boxes in the figure above. The code is available as a github repository. Apart from the flexibility offerred by such a pipeline architecture, another advantage is that it can be deployed as a distributed system on various servers. The RabbitMQ website goes into more details about the features and types of architectures that can be built.
Components
One must first install the latest version of RabbitMQ (it requires Erlang to be installed). It runs as a Windows Service.
After that, I installed Pika, an AMQP client for Python, which is quite straightforward. AMQP stands for Advanced Message Queuing Protocol, an open standard for message-oriented frameworks, and RabbitMQ is AMQP compliant.
For C++ applications, I am amking use of the rabbitmq-c client library by Alan Antonuk. The source code for this library can be found on github. Building and using this library requires a bit more work. First one has to configure and execute the make file using the CMake tool. I opted not to make use of OpenSSL and POpt. After running CMake, I then opened the generated solution file in Visual Studio 2017. And then I compiled and built the C++ rabbitmq-c client. This creates librabbitmq.4.lib, a static library, and rabbitmq.4.lib plus rabbitmq.dll for dynamic linking.
My example code makes use of OpenCV to illustrate sending of images as messages. Install both the C++ and Python versions of OpenCV, or else take out the code that makes use of OpenCV.
Running the Python and C++ producers and consumers
To build the C++ code, you need to load the provided solution file in Visual Studio. Include directories and paths to the OpenCV and rabbitmq-c libraries are specified in the supplied Visual Studio property sheets (RabbitMQ.props and OpenCV x64.props). You will need to modify these to make them point to the correct locations. Alternatively, change the project configuration settings directly.
There are various permutations that can be used when running the given code. You can either have both the producer and consumer be Python scripts. Or else both being C++ applications. Perhaps more useful, is to have a mixture, for example, a C++ producer sending messages to a Python consumer, or vice-versa.
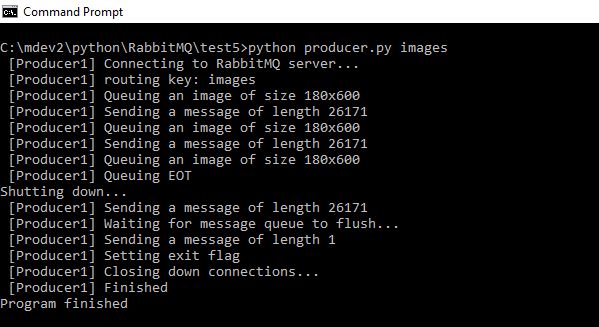
The tests can run with either string-based messages or image-based messages. Just pass the parameter “images”“ as argument to the C++ or Python applications for the latter case.
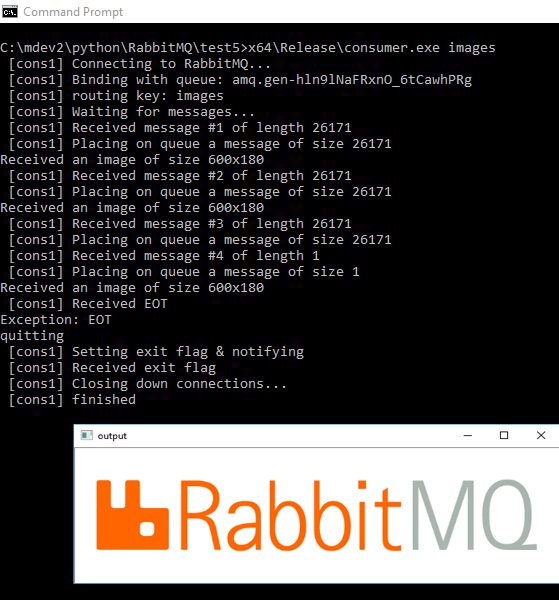
The following screenshots show a Python script acting as the producer and a C++ application being the consumer:
Test Results
Running some tests on message sizes and throughput rates, an image of size 275.9Mb was sent with no problems. And sending a burst of 1000 images (of size 600x180, 22Kb message size) took less than 1 second to finish - an effective rate of 300 fps (or messages per second).
Class structure
The producer and consumer classes (in both C++ and Python) have a background thread that takes care of sending and receiving messages. They also have an internal queue to handle internal communication between the different threads (intra-process communication). The producer classes offer a number of send() and send_image() methods to send strings, binary arrays and image data. Similarly, the consumer classes have receive() and receive_image() methods.
A producer class signals end of communication to its consumer(s), by sending a message consisting solely of the EOT (end-of-transmission) character (ASCII 04). This is done by the producer method send_EOT(). On the consumer’s side, when an EOT message is received, an EOT exception is thrown in order to alert the user.
Finally, the methods exit() and flush_and_exit() terminates the producer. The latter method waits until all messages in its internal queue are sent out before exiting.
I tried to keep the class interfaces of both the Python and C++ code as similar as possible.
Future
I am currently using these classes within an image-processing pipeline and found their use to be quite beneficial. By choosing the correct exhange types and routing (e.g. direct or fan out), various useful pipeline architectures can be set up.
For future work, I will look into other message-based and streaming architectures, such as Apache Kafka.


